
INTRODUCTION
The following Procedure explains how to set up Motion Recording on VIPER HDAL and VIPER HDA DVRs with Vista VK2 IP Cameras.
Note.
The VIPER HDAL or VIPER HDA have been switched to Hybrid mode. See separate “How to guide”
If multiple IP cameras are connected carry out the below steps for each camera.
Menu Screenshots are from latest Firmware Versions. {VIPER-HDAL-xx_v2.00_190924104326 & VIPER-HDA-xx_v4.03_190923164920} It is recommended that you upgrade to these versions or later to get the latest updates/features/menu layouts.
All guides are available here https://vistacctv.freshdesk.com/support/home
Method
- Right click on screen with mouse, Menu appears then left click [Log In]enter admins user and password to login (Fig 1)
- If “Easy Installation” runs, cancel by clicking on ‘X’ top right to continue with this procedure.
- Right click in live screen select [Setup] (Fig 2)
|
|
Fig 1 | Fig 2 |


- Setup Menu is displayed (Fig 3)
- Select [Camera] then [Advanced] then [IP Camera] (Fig 4)
|
|
Fig 3 | Fig 4 |


- Select Ch number then click [Type] should see drop down options box select [Stream](Fig 5)
Menu layout may differ on older firmware versions {see notes}
- Select [Setup]here you can check and change the stream settings of the camera (Fig 6)
- Max resolution supported on DVRs is 1920x1080
- Click [Apply] to send changes to camera, then cancel or click on ‘X’ top right. Then click [Save]
|
|
Fig 5 | Fig 6 |


- Next select [Video Analytics] (Fig 7) then [Setup]in this menu you can set up the “Motion Area” or multiple areas on the IP Camera that will trigger motion recordings (Fig 8)
- Set [Mode] to “On” Tick [Enable Video Content Analysis]
- In the “Object” you can set
- Sensitivity (higher the number the more sensitive)
- Min & Max size (use Show object size to give you an example
- Select [Motion]in “Detection Rule”
Older VK2 {H.264} cameras have different option, “Field & Line” use [Field] or set up the motion in the camera via browser (IE)
- Tick [Motion] in “View Rule” {not supported on older H.264 cameras}
- Then using the mouse left click and a draw detection or multiple detection areas
- Once done click [Apply] to send changes to camera, then cancel or click on ‘X’ top right. Then click [Save]
|
|
Fig 7 | Fig 8 |


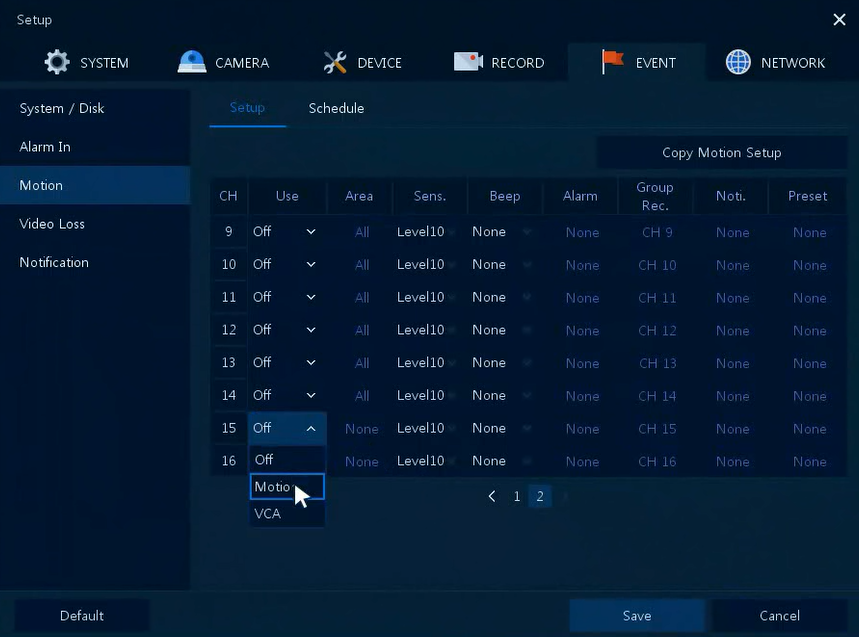
- Next select [Event] then [Motion] to enable Motion on the required Camera then click [Save] (Fig 9)
- Next select [Record] then [Schedule]select required channel to check motion schedule is set (Fig 10)
- Motion only
- C+M (Continuous + Motion)
- C+M+A (Continuous + Motion + Alarm)
|
|
Fig 9 | Fig 10 |

- Click [Save] then click ‘X’ to close menu
- Check DVR is recording in motion, should see
 in top right corner when motion is detected
This completes the procedure.
